
Are you tired of dealing with chlorine, and impurities when you shower? Installing a shower head filter is the perfect solution to improve the quality of your shower water — giving you softer, smoother hair and skin. In this comprehensive guide, we will walk you through the step-by-step process of how to install a shower filter, ensuring that you can enjoy cleaner, healthier water every time you step into your shower. Let's get started!
How to Install a Shower Filter
Before we jump into the actual steps, take a deep breath. There is no need to be overwhelmed or stressed, this process should be a breeze if you follow our detailed directions.
Step 1: Gather Your Tools and Materials
Before you begin the shower head filter installation, make sure you have all the necessary tools and materials handy. Here's what you'll need:
- Shower head filter kit: either an inline shower filter (independent part used with shower head of your choice) or a filtered shower head (filter built into shower head)
- Adjustable wrench or pliers
- Thread seal tape (also known as plumber's tape)
- Clean cloth or towel
Step 2: Prepare Your Shower Area
To avoid any water leakage or damage, it's essential to prepare your shower area before the shower filter installation. Start by turning off the water supply to your shower. You don't need to shut off the water to your house, just make sure that the shower valve is closed so water isn't running during installation.
Step 3: Remove the Existing Shower Head
Using an adjustable wrench or pliers, carefully loosen and remove the existing shower head. Turn it counterclockwise until it comes off completely.
If you are upgrading to a new shower head along with an inline shower filter, or are installing a filtered shower head, you can discard the old shower head. Otherwise, set it aside in a safe place for reinstallation.

Step 4: Apply Thread Seal Tape
Take a clean cloth or towel and wipe off any residue or debris from the shower arm. This will ensure a clean and tight seal. Next, take the thread seal tape and wrap it clockwise around the threaded end of the shower arm. Make sure to overlap the tape by about half of its width to create a secure seal.

Step 5: Remove Plastic/Sealant from Filter Cartridge
Most shower head filters come with plastic wrap or some sort of sealant at the ends to prevent filtration media from leaking out in transit. You'll want to open the housing of the filter before installation and remove any of that before making the installation.

Step 6: Attach the Shower Head Filter
When you're learning how to install a shower filter, it's important to be clear on the type of filter you're using. Depending on the type of shower head filter you selected, follow the appropriate steps:
a) Inline Water Filter Installation:
For an inline shower filter, take the shower head filter and attach it to the threaded end of the shower arm. Twist it clockwise by hand to secure it. Use the adjustable wrench or pliers to give it an additional quarter turn to ensure a tight connection.

Pro Tip: At this point, open the water supply to your shower by turning the shut-off valve counterclockwise and run warm water through the filter for at least one minute, or until the water starts to flow clear. Shower head water filters have residue that needs to be flushed out before reinstalling the shower head to eliminate the potential for clogs.
Now, take your preferred shower head and attach it to the threaded end of the inline shower filter. Twist it clockwise by hand to ensure a snug fit. Use the adjustable wrench or pliers to give it an additional quarter turn to tighten it further.
b) Filtered Shower Head Installation:
If you have a filtered shower head, simply attach it directly to the threaded end of the shower arm. Again, the shower filter is built into the shower head, so it really is that easy.

Twist it clockwise by hand to ensure a snug fit. Use the adjustable wrench or pliers to give it an additional quarter turn to tighten it further.
Pro Tip: At this point, turn on the water supply to your shower by turning the shut-off valve counterclockwise and run warm water through the filter for at least one minute, or until the water starts to flow clear. Shower head water filters have residue that needs to be flushed out before taking a shower.
Step 7: Check for Leaks
With the shower head filter securely in place, it's crucial to check for any leaks. Turn on the water supply to your shower by turning the shut-off valve counterclockwise as you normally would to take a shower. Slowly open the shower valve and let the water flow through the filter.
Inspect the connections for any signs of leaks. If you notice any leaks, tighten the connections slightly until they are sealed. If that doesn't work, remove the filter and inspect the rubber washers to make sure they weren’t damaged or pushed inside of the shower arm.
Step 8: Adjust the Shower Head Angle
Once you've confirmed that there are no leaks, adjust the angle of the shower head to your desired position. Most shower head filters offer swivel capabilities, certainly, shower heads used in conjunction with an inline shower filter do, allowing you to customize the water flow direction. Experiment with different angles until you find the perfect position that suits your needs.
Step 9: Enjoy Your Clean, Filtered Shower
Congratulations! You have successfully learned how to install a shower filter and completed your installation. Now, step into your shower and experience the difference. The shower head filter will effectively remove chlorine, impurities, and sediments, providing you with cleaner, healthier water for a refreshing shower.

How to Install a Shower Filter Cartridge Replacement
Each filter should come with detailed instructions from the manufacturer about how and how often to replace the filter cartridge. In general, you can expect to open the filter (usually by twisting counter-clockwise), pop out the used cartridge, and replace it with the new one. Be sure to inspect any gaskets or seals as you will also need to replace these if they are worn out.

You can keep your shower head attached to the filter housing when replacing to save yourself a step. That said, this is a good time to consider doing a deep cleaning of your shower head. Starting with a clean shower head is a great way to get the freshest start and purest water possible.
Pro Tip: The design of some filters and cartridges allows you to back flush the filter by flipping the cartridge around. Simply twist open the housing, remove the cartridge, wash off the screens on either end, and reinstall upside down. This will extend the life of your cartridge by 1-2 months if you are still within the recommended time frame for replacement. Please note this tip does not work with all filter types.
Overall Best Shower Filter
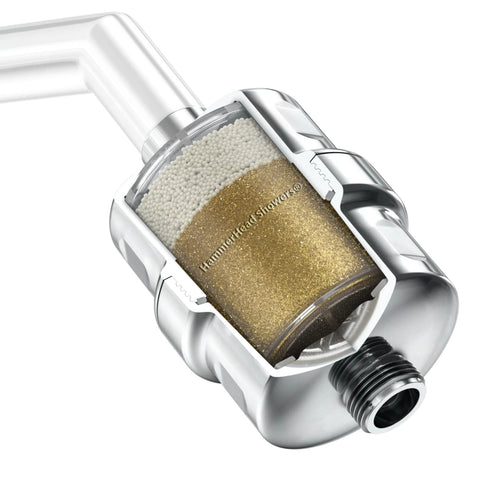

Our top shower filter pick is the HammerHead Showers Solid Metal Shower Head Filter, which fits the bill for both functionality and aesthetics. Each cartridge is filled with KDF and calcium sulfite, the most efficient filtration media, and is rated for 12 months (or 25,000 gallons) of use.
Its sleek brass housing is built to last and available in 4 commercial-grade finishes, allowing it to be subtly incorporated into your bathroom design.

To all of our fellow researchers, we invite you to take a closer look at some serious ways a shower head filter can protect your health and why they are an indispensable addition to your bathroom setup.
If you still aren't sure you need a shower head filter, keep reading because next we are going to highlight some of the top benefits of a shower filter.
Top Reasons You Need a Shower Filter
Look, we get it - for some, a shower filter might seem like a bit of overkill. But the bottom line is that the water you shower in does matter and can negatively affect your health.
Water Quality and Health
If you don’t like the idea of drinking harsh chemicals and contaminants, you probably aren’t keen on the prospect of inhaling or absorbing them either.
Unfiltered shower water can lead to allergic reactions and respiratory issues resulting from dissolved chemicals being released into the air when heated. What’s more, disinfection by-products, created by the addition of chlorine and chloramine into our water sources, trigger our body’s production of cell-damaging free radicals: making them carcinogenic (i.e. cancerous).
Shower filter installation effectively removes those noxious additives — reducing your contact with them and giving your body the chance to recover and repair from years of harmful exposure.
With so much power packed into one product, taking control of your health and your shower experience has never been so easy, affordable, and attainable.
Common Question About Shower Head Filter Installation
We hope this article has given you the details needed to install a shower head filter as well as answered any lingering questions you may have. Below are a few more common questions we often get from customers about shower head filters.
Are all shower head filters the same?
No, many filters on the market make big claims with little or no supporting evidence (multi-stage filters are gimmicky at best and dangerous for health at worst). The best shower filters are packed with KDF and Calcium Sulfite—the only science-backed filtration materials with proven efficacy and results.
How will I know when the shower head filter cartridge needs to be changed?
It’s not always easy to tell by looking at the filter cartridge itself. Many people choose to schedule cartridge changes at regular intervals depending on the type of filter, their household size, and the quality of their water—on average, every 6 months. Make it easy on yourself and set a reminder in your phone or put it on your calendar. Also, consider signing up for a re-occurring delivery every 3-6 months to get your new replacement cartridge exactly when you want it changed.
Is there a difference in quality between in-line shower filters and filtered shower heads?
No, both types can provide you with all the same benefits of a shower filter. But be aware that not all shower head filters follow through on their promises. It’s important to research the specific type and amount of filtration media used in the cartridge and determine how effective it will actually be.
Can you add a filter to any shower head?
Yes, shower head filter installation is possible with any shower head. That being said, it’s worthwhile to consider investing in additional hardware to accommodate the new positioning of your shower head, as even the smallest filters will add roughly two inches between the shower arm and the shower head.
Are shower head filters easy to install?
Absolutely. We’ve broken down the process into simple, easy to follow steps as part of our commitment to empowering our customers; with just enough know-how and the right products, you can avoid gimmicky marketing and costly professional services. Head over to our YouTube channel for more installation videos, troubleshooting, product reviews, and inspiration.
Do shower filters reduce water pressure?
While they could, if you follow our steps for how to install a shower filter, your water pressure will not be greatly affected. You might actually find that shower filter installation improves pressure by removing minerals and debris before they can clog your shower head! You may notice a reduction in pressure when a filter is clogged, which is a clear indication that it's time to replace your cartridge.
Free Water Quality Report
Find Out What Exactly Is Lurking In Your Water
With Our Free Water Quality Report.
⬇️ Complete The Form Below! ⬇️