
So, you’ve finally decided to upgrade that old shower head. Good call! Now comes the tricky part - figuring out how to install a shower head (without calling a plumber).
But here’s some good news: Whether you’re switching to a solid metal handheld, a rainfall shower head, or just a high-quality wall-mount, installing a new shower head is one of the easiest upgrades you can make. No fancy tools and no plumber required.
At HammerHead® Showers, we know a thing or two about showers (to put it mildly). We’ve spent years not only designing high-performing shower heads, but also installing and testing every product we sell.
In this comprehensive guide, we’ll walk you through exactly how to install a new shower head and give you all our pro tips. From removing an old plastic shower head to tightening up your shiny new solid metal one, you’ll learn the simple steps to get better water pressure, fewer leaks, and a longer-lasting shower setup - all in under ten minutes.
So let’s grab that wrench and get started.
Tools for Installing a Shower Head
Before you start pulling off your old shower head, it’s important to make sure you’ve got the right gear. The good news? Installing a shower head doesn’t require a full toolbox - just a few simple items you probably already have lying around.
Here’s what you’ll need:
-
Shower Head: Go with quality here. At HammerHead® Showers, we’ve got a great selection of solid metal shower heads that are built to last and perform - no cheap plastic parts in sight.
-
Thread Seal Tape: Also known as plumber’s tape. Grab a roll of the white kind used for plumbing. It’s about $2 and worth every penny for preventing leaks. If you purchase a HammerHead® shower head it will come with complementary plumber’s tape.
-
Rubber Sealing Washer: This little piece is the unsung hero of a watertight connection. (Don’t worry, it comes included with your new shower head when you shop with HammerHead® Showers.)
-
Adjustable Wrench or Pliers: Handy for extra tightening power. Just remember: your grip should be firm, not furious. Over-tightening can damage your finish or threads.
-
Terry Cloth: Wrap this around your shower head when using tools to protect that shiny metal finish. You’ll thank yourself (and us) later.
-
Safety Goggles: Because water pressure and dropped tools don’t mix. Better safe than sorry.
-
Ladder: Needed only if you’re swapping out a ceiling-mount shower head. Don’t risk a wobbly reach when upgrading your shower.
-
Optional: Old toothbrush or cleaning cloth: Great for removing built-up grime or old tape from the shower arm threads.
HammerHead® Pro Tip: If you’re upgrading to one of our solid metal shower heads, skip the over-tightening. Metal-to-metal connections don’t need brute force. Just a snug fit with a little plumber’s tape will do the trick.
Once you’ve got everything on hand, it’s time to say goodbye to your old shower head and make room for a serious upgrade.
Read on for step-by-step instructions to install each of the different types of shower heads we sell here at HammerHead® Showers.
How To Install a Wall-Mount Shower Head: Fixed or Rain Shower Head
A wall-mount shower head is about as basic as it comes. It’s a great project if you’re new to figuring out how to install a shower head.
A wall-mounted shower is exactly what it sounds like: the shower arm extends out from your shower wall, not your ceiling.
Sure, the setup is simple, but you’ve still got options. Want to give your wall-mount shower a more spa-like feel? Swap in an adjustable shower arm to shift the height or angle of your shower head. Or, stick with a solid metal 7-inch shower arm for a classic look.
No matter which style you choose, nearly all shower heads share the same ½-inch female threading, designed to fit perfectly with the ½-inch male threads on your shower arm. Translation: installation is quick, universal, and hassle-free.
Here's our top wall-mounted fixed shower head recommendation:
| Standard Shower Arm | HammerHead Showers Fixed Shower Head |
 |
 |
Here are our top wall-mounted rain shower head recommendations. Important note: when using a wall-mounted rain shower, an 8-inch shower head is recommended for the best water pressure and flow.
| 8-Inch Rain Shower Head | 8-Inch Rain Shower Head with Adjustable Shower Arm |
 |
 |
Step-by-Step Guide to Installing a Wall-Mounted Shower Head
Now that you have our picks for a wall-mounted shower head, let’s walk through exactly how to install a new shower head on your shower wall.
-
Remove the old shower head. You can attempt to remove it by hand, but if it's been on there for a while, you might need to use an adjustable wrench or pliers. Remember: Righty-Tighty, Lefty Loosy. If you plan to save your old shower head, wrap a cloth around the fitting before grabbing hold with the wrench/pliers to protect the finish.
-
Remove old thread seal tape and wipe away any debris from the shower arm. You can use a toothbrush or a cleaning cloth to remove any stubborn stickiness.
-
Wrap thread seal tape around the shower arm. Starting at the bottom of the shower arm, apply the thread seal tape clockwise to ensure that it doesn't unwind when you're screwing the shower head onto the shower arm. Tightly wrap the thread seal tape 3-4 times, moving up to the top of the shower arm. Press the thread seal tape firmly to the shower arm to make sure it adheres properly.
-
Thread the new shower head onto the shower arm. Ensure the included rubber washer is seated inside the threaded area of the shower head, and then hand-tighten the shower head.
-
Use the adjustable wrench or pliers for extra tightening. Some shower heads have plastic fittings, which must be hand-tightened only, while others have brass fittings with little notches meant for tightening with a wrench or pliers. Verify which you have and install accordingly. If your shower head is from HammerHead® Showers, then it is solid metal and can be tightened with pliers.
- Check the new shower head for leaks. If it's leaking, repeat steps 3-6.
There you have it! You now know how to install a shower head on your shower wall!
-> Video: How To Install a Fixed Shower Head
How To Install a Ceiling-Mounted Rain Shower Head
Learning how to install a rain shower head in your ceiling is one of the most luxurious upgrades you can make to your bathroom. These shower heads are connected to a vertical shower arm that extends straight down from the ceiling.
If your current setup doesn’t already have a shower arm attachment coming from the ceiling, this project is best left to the pros. We highly recommend hiring a licensed, insured plumber for any major plumbing modifications. Ceiling installs require rerouting water lines and sealing connections overhead - definitely not your average weekend DIY.
However, if you are just wondering how to install a new shower head for an existing ceiling mount, we've got you covered. Like the vast majority of shower heads, rain shower heads typically have 1/2 inch female IPS threads and fit perfectly with the vast majority of 1/2 inch male IPS threads.
Here's our ceiling-mounted shower head recommendation. Important note: when using an overhead rain shower, a 12-inch shower head is recommended for the best coverage and flow.
| 6" Ceiling Mount Shower Arm | 12" Rain Shower Head |
 |
 |
Step-by-Step Guide to Installing a Ceiling-Mounted Rain Shower Head
Already have a ceiling-mounted setup? Then let’s walk through exactly how to install a new overhead rain shower head.
-
Remove the old shower head. You can attempt to remove it by hand, but if it's been on there for a while, you might need to use an adjustable wrench or pliers. Remember: Righty-Tighty, Lefty Loosy. If you plan to save your old shower head, wrap a cloth around the fitting before grabbing hold with the wrench/pliers to protect the finish.
-
Remove old thread seal tape and wipe away any debris from the shower arm. You can use a toothbrush or a cleaning cloth to remove any stubborn stickiness.
-
Wrap thread seal tape around the shower arm. Starting at the bottom of the shower arm, apply the thread seal tape clockwise to ensure that it doesn't unwind when you're screwing the shower head onto the shower arm. Tightly wrap the thread seal tape 3-4 times, moving up to the top of the shower arm. Press the thread seal tape firmly to the shower arm to make sure it adheres properly.
-
Thread the new shower head onto the shower arm. Ensure the included rubber washer is seated inside the threaded area of the shower head, and then hand-tighten the shower head.
-
Use the adjustable wrench or pliers for extra tightening. Some rain shower heads have plastic fittings, which must be hand-tightened only, while others have brass fittings with little notches meant for tightening with a wrench or pliers. You'll want to verify which you have and perform your shower head installation accordingly. At HammerHead® Showers, all of our rain shower heads have solid metal fittings and can be tool-tightened during installation.
-
Check for leaks. If it's leaking, repeat steps 3-6.
-> Video: How To Install an Overheard Rain Shower Head
How to Install a Wall-Mounted Overhead Rain Shower
If you don’t already have ceiling-mounted plumbing set up for your shower, you can still get the same overhead rainfall experience without touching your home’s plumbing. All you need is an overhead shower arm, which extends your existing wall outlet upward and out, giving you that spa-like, overhead flow without any complicated work.
In this section, we’ll walk you through how to install a wall-mounted overhead rain shower head.
Here's our wall-mounted overhead shower head recommendation. Important note: when using an overhead rain shower, a 12-inch shower head is recommended for the best coverage and flow.
| 16" Overhead Shower Arm | 12" Rain Shower Head |
 |
|
Step-by-Step Guide to Installing a Wall-Mounted Overhead Rain Shower Head
-
Remove your old shower head. Try loosening it by hand first, but if it’s been there a while, you might need a little help from an adjustable wrench or pliers. (Quick reminder: righty-tighty, lefty-loosey.) If you’re planning to keep your old shower head, wrap a cloth around the fitting before using tools so you don’t scratch the finish.
-
Clean the shower arm. Peel off any old thread seal tape and wipe the threads clean. A toothbrush or small cleaning cloth works great for getting rid of sticky residue or mineral buildup.
-
Apply new thread seal tape. Starting at the base of the shower arm threads, wrap the tape clockwise 3–4 times, working upward. This keeps it from unraveling when you install the new shower head. Press the tape firmly into the threads so it adheres well and creates a watertight seal.
-
Attach your new rain shower head. Make sure the included rubber washer is in place inside the threaded end of the shower head. Then hand-tighten it onto the shower arm until snug.
-
Tool-tighten if needed. For extra security, use an adjustable wrench or pliers to tighten further - but only if your shower head has the metal fittings designed for it. Some rain shower heads with plastic fittings should be hand-tightened only. All HammerHead® Showers rain shower heads are built with solid metal fittings, so you can confidently tighten with tools for a secure, leak-free connection.
-
Check for leaks. Turn on the water and inspect the connection. If you notice any dripping, remove the head, reapply the tape, and repeat steps 3–5.
How To Install a Handheld Shower Head
Learning how to install a handheld shower head gives you the flexibility to rinse your hair, shave your legs, or even clean your pets more easily.
Handheld shower heads typically come with three components: the shower head itself, the shower hose and the shower holder bracket.
Here's our handheld shower head recommendations:
| 7" Shower Arm | Solid Metal Hand Held Shower Head Set |
|
|

 
|
Step-by-Step Guide to Installing a Handheld Shower Head
Luckily, learning how to install a handheld shower head is just as simple as the other shower head installation projects we already covered!
Let’s get started:
-
Remove the old shower head. Start by trying to loosen it by hand. If it’s been there for years (and let’s be honest, it probably has), grab an adjustable wrench or pliers for extra leverage. If you’re planning to reuse the old head, wrap a cloth around the fitting before using tools to protect the finish. Quick reminder: righty-tighty, lefty-loosey.
-
Clean the shower arm. Peel off any old thread seal tape and wipe away leftover residue or buildup. A quick scrub with a toothbrush or cleaning cloth helps remove anything stubborn.
-
Apply new thread seal tape. Starting at the base of the shower arm, wrap the tape clockwise three to four times, moving upward. This ensures it won’t unravel when you attach your new shower bracket. Press the tape firmly into the threads for a snug, watertight seal.
-
Check the rubber washer. Make sure the rubber washer included with the shower head is seated inside the threaded opening of your shower holder bracket before installation. This tiny piece is key to preventing leaks.
-
Attach the shower holder bracket. Hand-tighten the bracket onto the shower arm until it’s snug and stable.
-
Tool-tighten if needed. If your bracket has metal fittings, you can use a wrench or pliers for a firmer connection. For plastic fittings, hand-tighten only - too much torque can crack the plastic. At HammerHead® Showers, all our handheld models come with solid metal fittings, so you can tighten confidently without worrying about damage.
-
Install the hose. Check that the rubber washers are in place on both ends of the shower hose. (Most hoses include them, but if not, a bit of thread seal tape will do the trick.) Hand-tighten one end of the hose to the handshower and the other to the bottom of the holder bracket.
-
Dock your handheld shower head. Place the handheld into the holder bracket - it should sit securely and pivot smoothly.
-
Check for leaks. Turn on the water and inspect each connection. If you spot any drips, remove and rewrap the tape, then repeat steps 3–8 until everything’s watertight.
-> Video: How To Install a Hand Held Shower Head
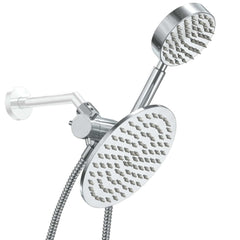
How To Install a Dual Shower Head
A dual shower head, or combo shower head, gives you all the flexibility of a handheld with the extra feature of a rain shower head.
Learning how to install a shower head with a handheld combo is one of the simplest ways to give your shower a major upgrade.
Dual shower heads typically come with 4 main components: a handheld shower head, a rain shower head, a shower hose and a shower holder/diverter, which allows you to switch between each shower head or run both at the same time.
Here are our Dual Shower Head Combo recommendations:
| 7" Shower Arm | HammerHead® Showers 1-Spray Dual Shower Head Set | |
|
|
Step-by-Step Guide to Installing a Combo Shower Head
Ready to figure out how to install your dual shower head combo? Let’s get started!
-
Remove the old shower head. Start by loosening it by hand. If it’s been stuck for years, grab an adjustable wrench or pliers for a little extra power. Planning to reuse the old one? Wrap a cloth around the fitting before gripping with your tools to keep the finish scratch-free. (Righty-tighty, lefty-loosey, in case you need the reminder.)
-
Clean the shower arm. Peel off any old thread seal tape and wipe the threads clean. Use a toothbrush or cloth to get rid of any leftover residue or gunk.
-
Apply new thread seal tape. Starting at the base of the shower arm, wrap the tape clockwise three to four times, working your way up. Press it down firmly so it adheres well and creates a watertight seal when you attach your new diverter.
-
Check the rubber washer. Make sure the rubber washer is properly seated inside the threaded opening of your shower holder diverter before installation.
-
Attach the shower holder diverter. Hand-tighten it onto the shower arm until secure and straight.
-
Tool-tighten if needed. Some diverters come with plastic fittings that should be hand-tightened only. Others - like the ones on all HammerHead® Showers dual systems - feature solid metal fittings designed to handle tool-tightening. If yours is metal, use a wrench or pliers for a snug, leak-free connection. Avoid over-tightening, especially with plastic parts, since they can crack under pressure.
-
Prep the fixed or rain shower head. Check that the rubber washer is seated inside the threaded opening of your fixed or rain shower head.
-
Attach the fixed or rain shower head. Hand-tighten it onto the front of the diverter until secure.
-
Tool-tighten if needed. Use a wrench or pliers to give it a gentle extra turn, following the same tightening rules from Step 6.
-
Install the hose. Verify that the rubber washers are in place on both ends of the handheld shower hose. (If not, a little thread seal tape will do the trick.) Hand-tighten one end of the hose to the handheld shower head and the other to the bottom of the diverter.
-
Dock your handheld shower head. Place the handheld into the holder bracket, adjusting it so it sits comfortably and faces the right direction.
-
Check for leaks. Turn on the water and test both outlets. If you see drips, remove the parts, reapply tape, and repeat Steps 3–11 until everything’s perfectly sealed.
-> Video: How To Install a Dual Hand Held Shower Head Combo
Common Questions About Installing a New Shower Head
Still have questions about how to install a shower head? Here are our expert answers:
Do I need a plumber to install a new shower head?
Not usually. Most shower heads can be installed in minutes with basic tools like an adjustable wrench and some plumber’s tape. However, if you’re moving plumbing lines - for example, adding a ceiling-mounted rain shower - that’s when it’s time to call a licensed, insured plumber.
How do I stop my shower head from leaking?
Leaks are almost always caused by worn-out washers or missing thread seal tape. Remove the shower head, rewrap the threads with fresh tape (clockwise, three to four wraps), and tighten securely. If it’s still dripping, double-check that the rubber washer is seated correctly inside the fitting.
Can I use thread seal tape on every shower head?
Yes - and you should. It helps prevent leaks and makes removing your shower head easier down the road. Just remember to wrap it clockwise so it doesn’t unravel when tightening.
How tight should I make my shower head?
Tight enough to prevent leaks, but not so tight you damage the fittings. Hand-tightening is usually sufficient for plastic connections. For solid metal shower heads (like ours), you can safely use a wrench for an extra snug fit.
What size threads do shower heads use?
Almost all modern shower heads and shower arms in the U.S. use ½-inch NPT threads, so they’re universal and interchangeable. That means you can swap most shower heads without worrying about compatibility.
How often should I replace my shower head?
A quality solid metal shower head can last decades with proper care. Plastic models, on the other hand, tend to lose pressure or crack within a few years. If you’re seeing mineral buildup or weak flow, it’s probably time for an upgrade.
Can I use the same installation process for any shower head type?
Yes - the general process (remove, clean, tape, tighten, test) is the same for most shower heads. The main difference is the configuration: wall-mount, handheld, rain, or dual setups may have extra brackets or hoses to attach.
Ready to Install a New Shower Head?
No matter which type of solid metal shower head you choose, learning how to install a shower head is a simple skill you can use to give your shower a major upgrade. The right showerhead can make all the difference when it comes to truly enjoying your shower experience!
If you’re more of a visual learner, don’t forget to watch our showerhead installation videos - we’ll show you just how easy it really is!
Do you have questions about how to install a shower head in your bathroom? Don’t hesitate to reach out and contact The Showerhead Store today.